

Day 11: Mastering Git & GitHub: Essential Tools for DevOps Excellence

🚀 Aspiring DevOps Engineer | Automation Enthusiast 🤖 🔧 Bridging Dev and Ops to streamline software delivery and boost productivity. 📚 Learning CI/CD, containerization, and infrastructure as code for better software workflows. 💡 Passionate about optimizing processes and reducing manual tasks for top-notch software quality. 🛠️ Exploring DevOps tools: Docker, Kubernetes, Jenkins, Terraform, and more. 🌐 Let's connect, learn, and grow together in the exciting world of DevOps! 🌱
What is Git Stash?
Git stash is a command that allows developers to temporarily save changes that have not been committed to a branch. It's particularly useful when you're working on a specific task but need to switch to another branch to address an urgent bug or tackle a different feature. Stashing your changes allows you to switch branches without committing to half-finished work.
To use Git stash, you first create a new branch and make some changes to it. Then you can use the command git stash to save those changes. This will remove the changes from your working directory and record them in a new stash. You can apply these changes later. git stash list command shows the list of stashed changes.
You can also use git stash drop to delete a stash and git stash clear to delete all the stashes.
How to Use Git Stash:
Using Git stash is straightforward. Here's a step-by-step guide to get you started:
Make sure your current branch is clean (no uncommitted changes).
Use the command:
git stashto save your current changes.You can stash multiple times, creating a stack of stashes.
After stashing, your working directory is clean, and you can switch branches or perform other tasks.
To retrieve your stashed changes, use
git stash applyfollowed by the stash reference (e.g.,git stash apply stash@{0}).Optionally, you can use
git stash popto retrieve the changes and remove the stash from the stack.
Cherry-pick
Cherry-pick is a Git feature that allows you to choose and apply specific commits from one branch to another. This feature can be particularly useful when you need to pull in changes or fixes from another branch or repository without merging the entire branch.
How to Cherry-Pick a Commit in GitHub:
Using cherry-pick in GitHub is straightforward. Here's a step-by-step guide:
First, ensure you are on the branch where you want to apply the cherry-picked commit.
Navigate to the repository on GitHub.
Locate the commit you want to cherry-pick and click on it to view the commit details.
Click on the "Copy SHA" button to copy the commit's unique identifier.
Return to your local repository and run the following command:
git cherry-pick <commit-SHA>
Replace <commit-SHA> with the SHA-1 hash of the commit you copied.
Git will attempt to apply the changes from the selected commit to your current branch. If there are any conflicts, you'll need to resolve them manually.
After resolving conflicts, commit the changes.
Finally, push the updated branch to your remote repository on GitHub.
Resolving Conflicts
Conflicts can occur when you merge or rebase branches that have diverged, and you need to manually resolve the conflicts before git can proceed with the merge/rebase. git status command shows the files that have conflicts, git diff command shows the difference between the conflicting versions and git add command is used to add the resolved files.
Task 1
Create a new branch and make some changes to it.
  git checkout -b feature
  git branch
  vim version01.txt
  git add .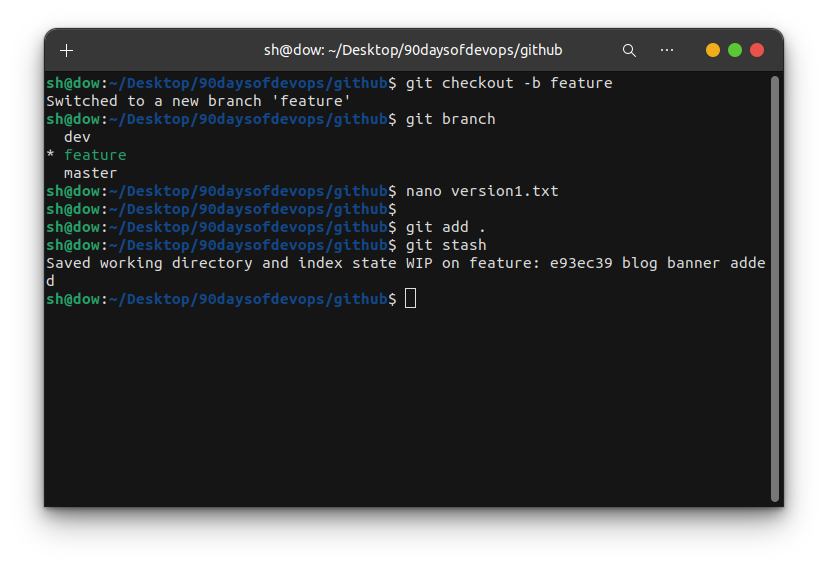
Use git stash to save the changes without committing them.
  git stash
  git status
Switch to a different branch, make some changes and commit them.
  git checkout -b development
  vim version01.txt
  git add .
  git commit -m "New version file commited"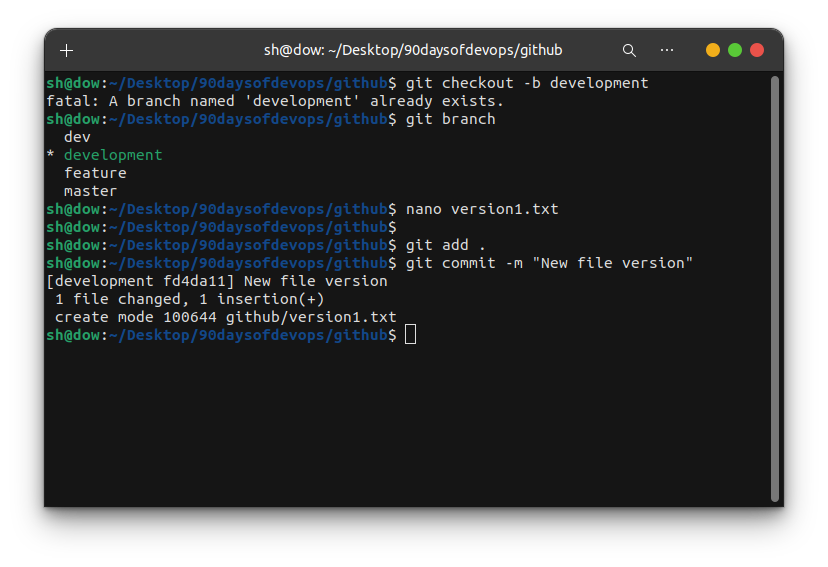
Use git stash pop to bring the changes back and apply them on top of the new commits.
  git stash list
  git stash pop
  git add .
  git commit -m "git stash file commited"
  git log --oneline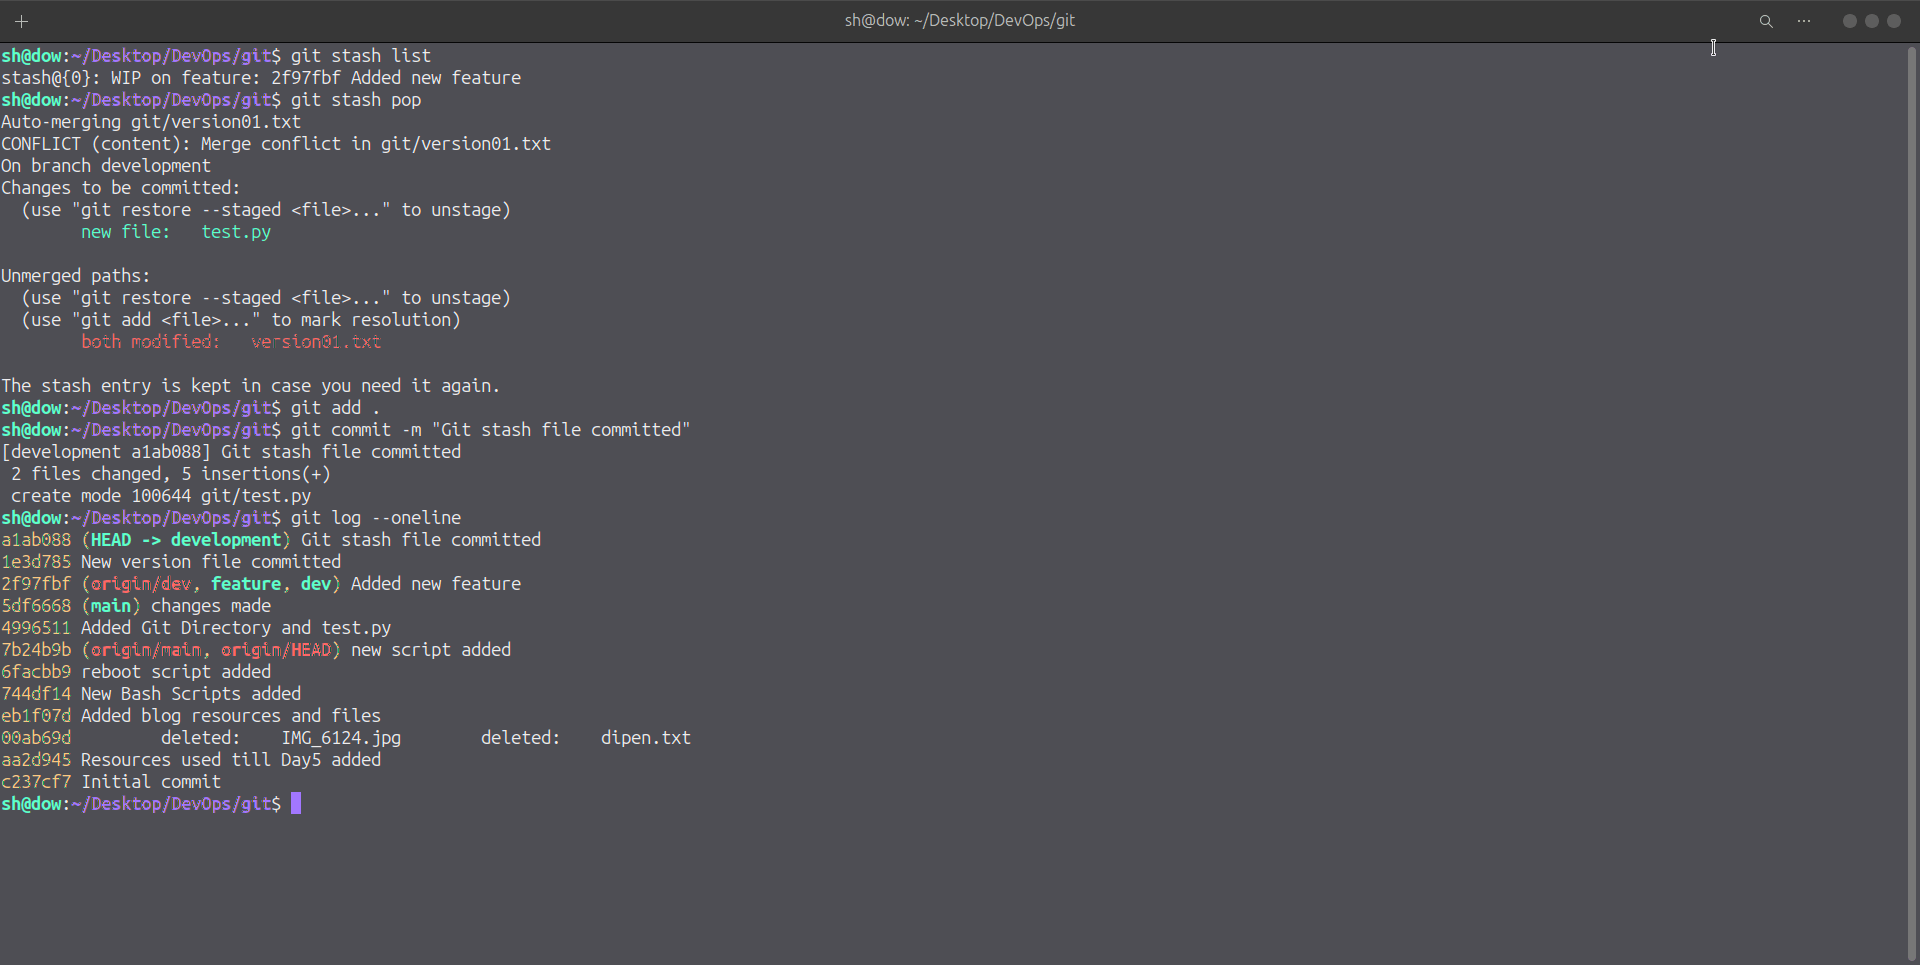
🔶 Task-02
In version01.txt of the development branch add the below lines after “This is the bug fix in the development branch” that you added in Day10 and reverted to this commit.
  git checkout dev
  vim version01.txt
  cat version01.txt
  git add version01.txt
  git commit -m "New commited file on dev"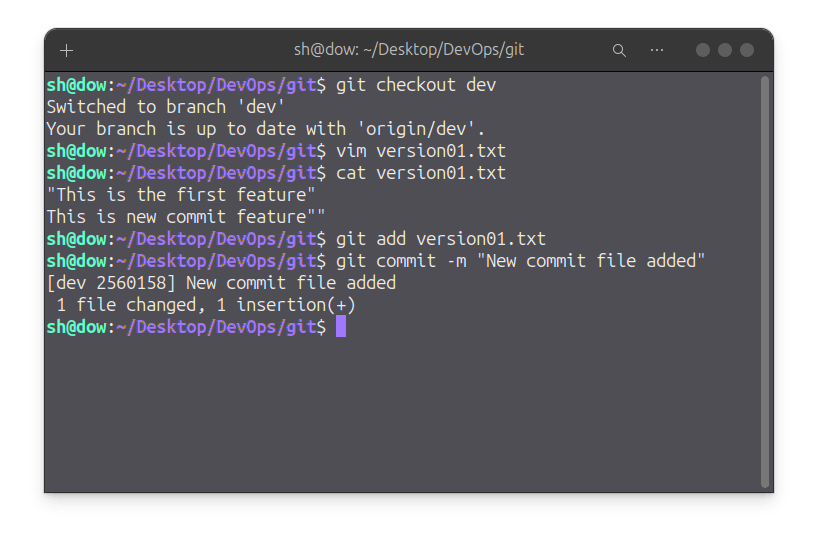
Line2>> After bug fixing, this is the new feature with minor alterations”
Commit this with the message “ Added feature2.1 in development branch”
  vim version01.txt
  git add version01.txt
  git commit -m "Added feature 2.1 in development branch"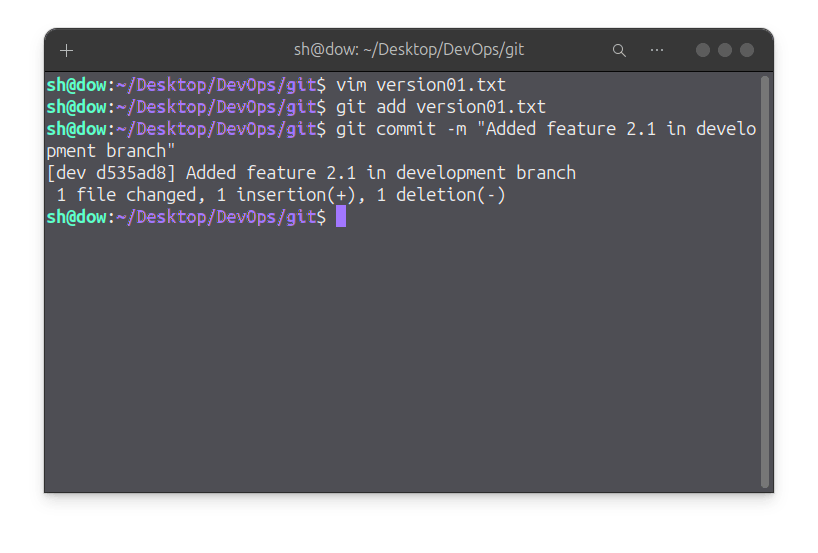
Line3>> This is the advancement of the previous feature
Commit this with the message “ Added feature2.2 in development branch”
  vim version01.txt
  git add version01.txt
  git commit -m "Added feature 2.2 in development branch"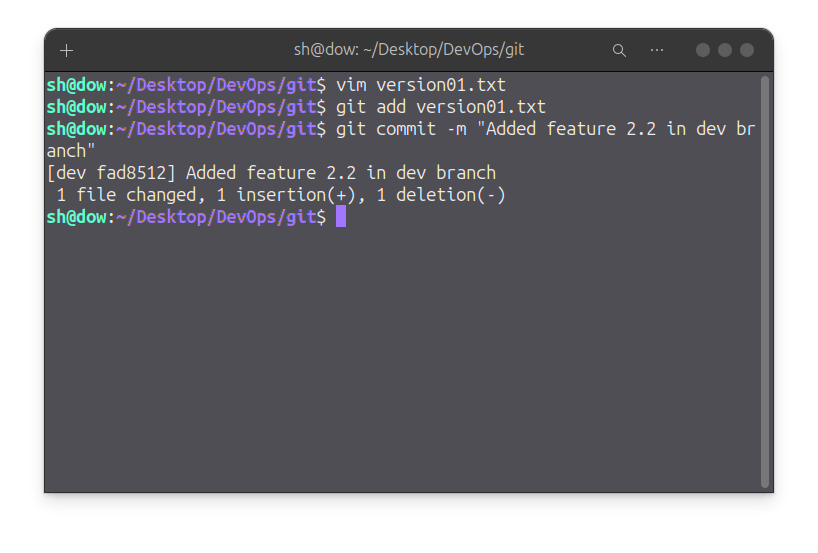
Line4>> Feature 2 is completed and ready for release
Commit this with the message “ Feature2 completed”
  vim version01.txt
  git add version01.txt
  git commit -m "Feature2 completed"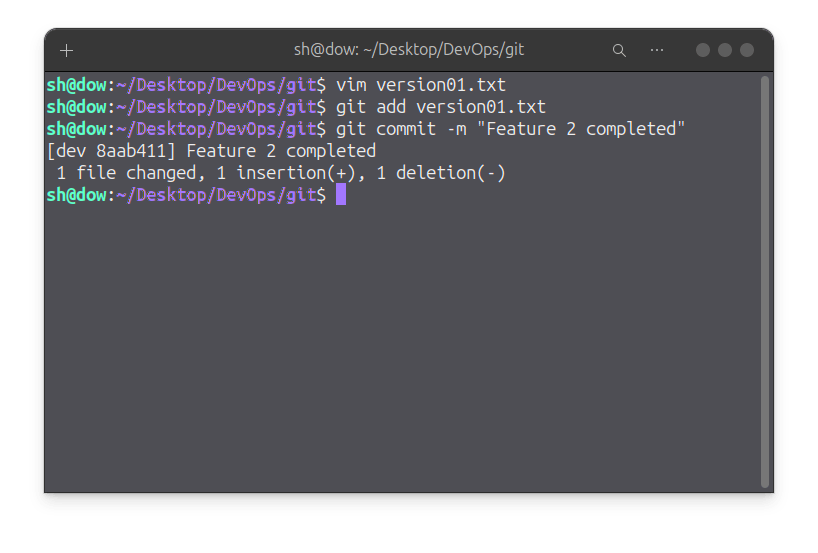
All these commit messages should be reflected in the Production branch too which will come out from the Master branch (Hint: try rebase).
  git checkout -b prod
  git rebase dev
  git log --oneline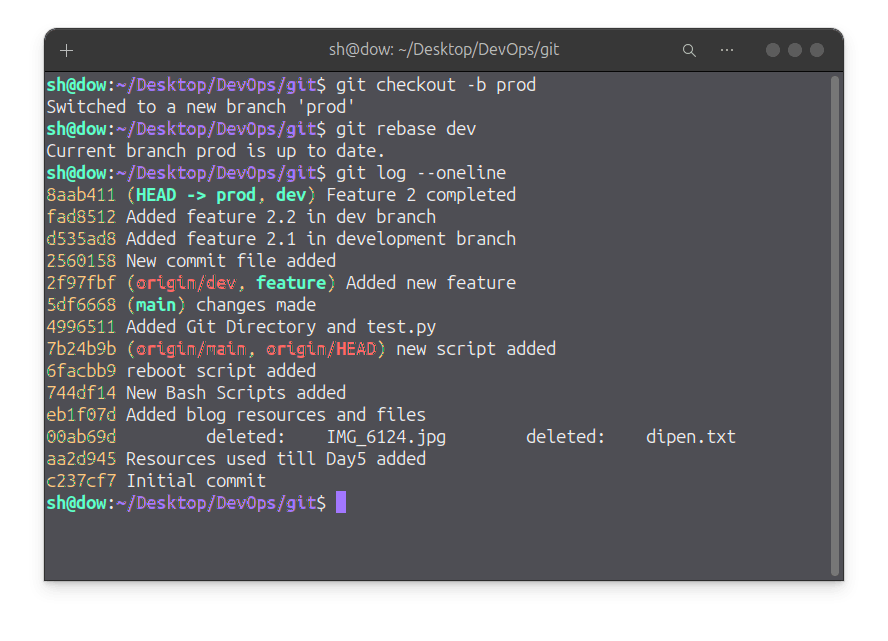
🔶 Task-03
In the Production branch Cherry picked Commit “Added feature2.2 in development branch” and added the below lines in it.
git cherry-pick fad8512The line to be added after Line3>> This is the advancement of the previous feature
  vim version01.txt "This is the advancement of previous feature"
  git add version01.txt
  git commit -m "Advancement feature"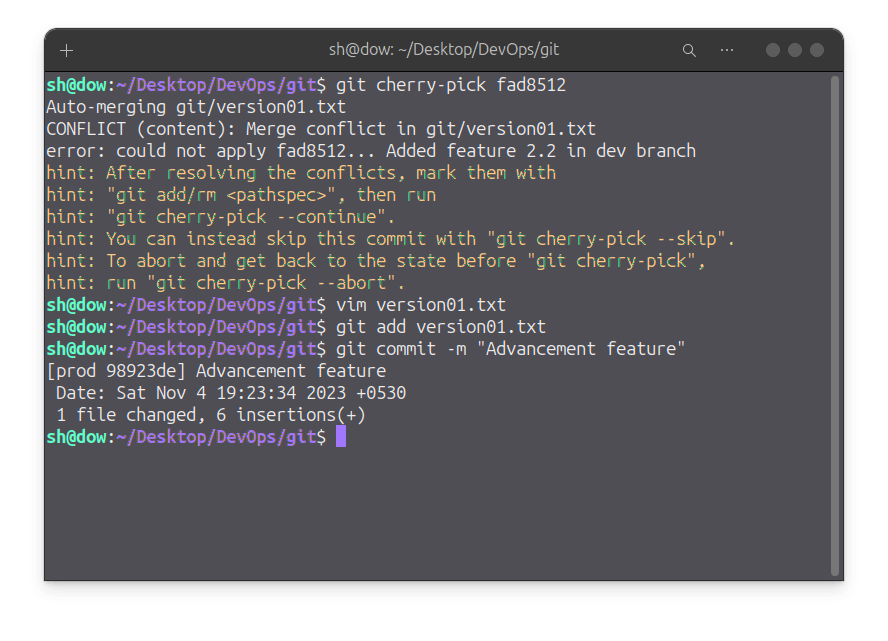
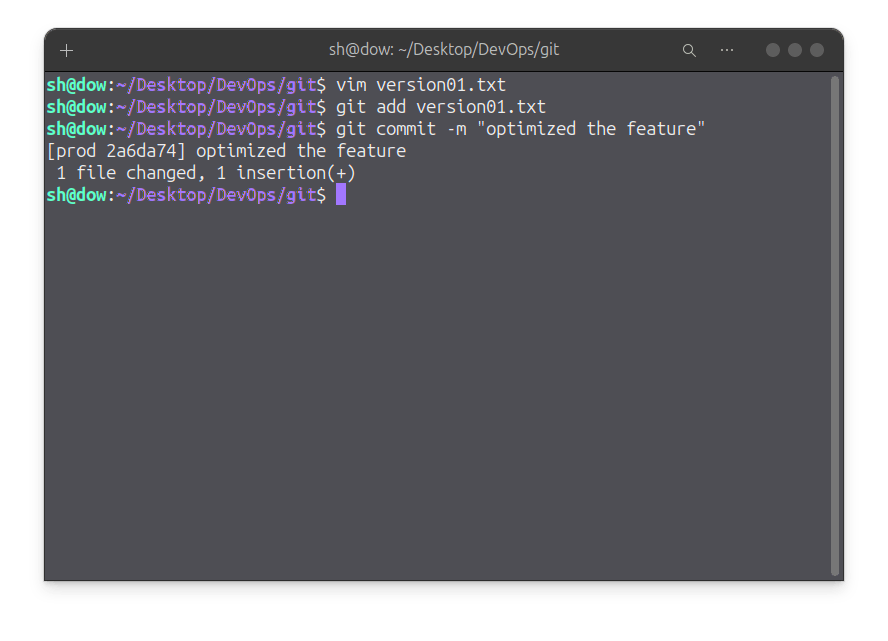
Line 4>>Added a few more changes to make it more optimized.
Commit: Optimized the feature
vim version01.txt "Added few more changes to make it more optimized"
git add version01.txt
commit -m "Optimized the Feature"
"Fuel my passion and support my journey by clicking 'Buy me a coffee' today!"
~ Dipen : )


